As women, our breasts are a marker of womanhood. For most of us, our boobs are the first sign of the transition between childhood and becoming an adult, often long before our period crashes the party and makes us question if growing up is really for us. We, however are positive that everyone is capable of building the body of their dreams. Of course, along with great breasts comes great responsibility, and we have to learn how to make our unique boobs work for us. Stand in front of a mirror bra-less or with minimal support. Slouch, letting your spine curve and shoulders cave. How are your boobs looking? Probably not so great.
We have collected the most efficient yoga poses that will not only improve the shape of your breasts and the volume of your lungs, but also make you feel strong and healthy. These seven yoga poses focus on three main areas: Your thoracic spine (the 12 vertebrae in your chest area that connect to your ribs), your core muscles, and of course stretching out your chest. When these areas are strong and open, perfect posture becomes your default and makes your breasts look young again, and they’re also a great way to stay active and healthy!
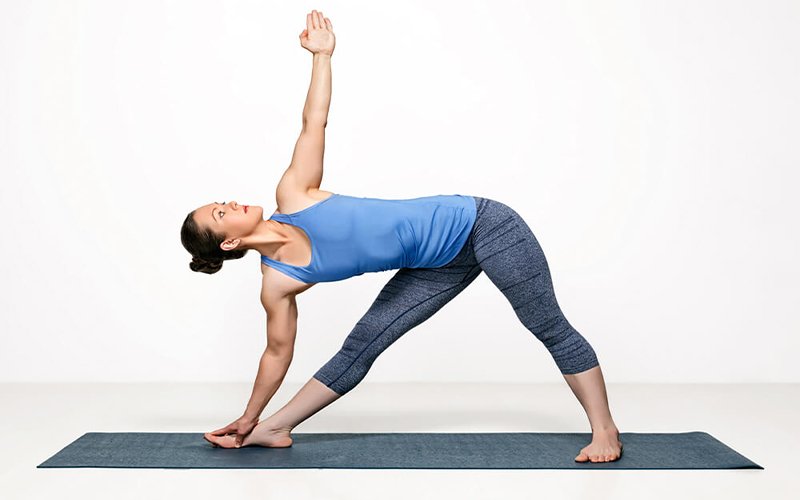
1. Triangle Pose
Triangle pose (or Trikonasana) is all about lengthening. It will release and strengthen your thoracic spine and stretch the rest of your spine in the process. This long spine helps you stand tall and show off your boobs. Bonus: Triangle also improves blood flow if you need a mid-day pick up.
- Facing the long edge of your mat, step your feet wide apart, about the length of your leg.
- Turn your right foot 90 degrees so the toes point to the short edge of the mat, and turn the left foot in about 45 degrees towards the right.
- Distribute weight evenly over the four corners of both feet, lift arches and inner ankles up.
- With straight legs, lift your knee caps drawing the top of thighs up and back, roll the right thigh out so the right knee is in line with first two toes.
- Lengthen through both sides of the waist, draw you lower belly in and up. Inhale and lift your arms parallel to the floor, extend through to the fingertips as you exhale.
- Inhale and reach to the right extending your body over your right leg, shift your hips towards the back of the mat and exhale as you bring your right arm down, placing your hand where it reaches, either on the leg, foot, the floor or a block outside the foot.
- Point the left arm straight up to the ceiling, hand in line with your shoulder, palm facing forwards.
- Keep as much length in the left side waist as in the right, rotate your ribs to the ceiling.
- Lengthen through the sides of the neck, keeping your neck in line with spine. Look straight in front of you, or tuck the chin slightly and turn to look up toward your left hand.
- Keep your face relaxed and breath gently as you keep pressing through the feet, extending through fingertips and lengthening through the crown of the head.
- To come out press your feet firmly into the floor, inhale and reach your left arm up to the ceiling as you come back to standing straight.
- Pivot your heels so you reverse the orientation of your feet to the other side and repeat on the left.
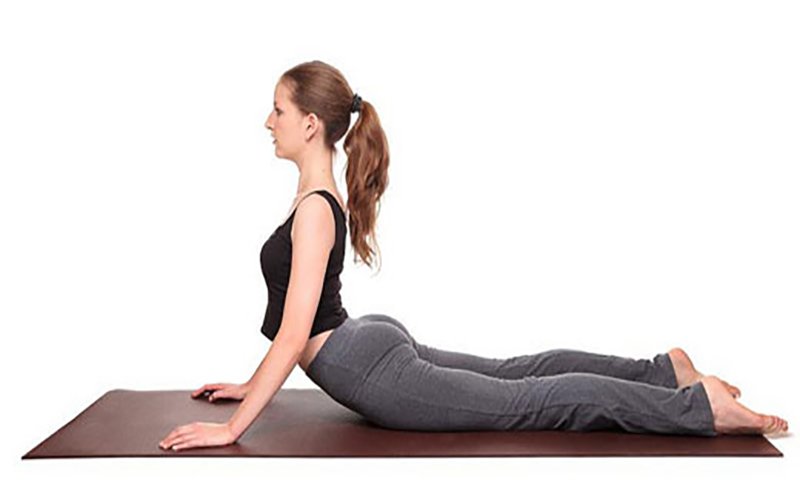
2. Cobra Pose
Cobra (or Bhujangasana) is an incredible thoracic stretch and ab-strengthener. Ab strength is key to not collapsing inward and hiding your breasts. Bonus: Cobra is a great way to increase lung volume so you can take deep, calming breaths.
- Lie on your stomach, toes pointing straight back, hands underneath the shoulders, elbows close to the body. Legs engaged, roll inner thighs inward, but keep the heels pointing up, pull the belly in and up and the forehead on the floor.
- On an inhalation, lift from the back of your heart to bring your chest up. Roll the collarbones up and firm the shoulder blades into the upper back, a little down along the spine.
- Then lift your head, open your heart, with no weight in the hands yet. Extend out through the toes.
- Come down again on an outbreath. You can repeat that two times..
- The third time when you come up, you can help with the hands and come up higher. Lift your chest first (from the back of your heart), head follows. Firm the tailbone in towards the pubis and draw the lower belly in and up. Come up all the way up to a point where it feels good to you, still maintaining a connection from the pelvis to the legs.
- Bring the side ribs forward, draw the upper arm bones back, lengthen the neck.
- Feel the backbend through the entire spine.
- In the final pose you can look up, but only if you maintain length in the back of the neck and for that your chest needs to be really open and you need to be able to lift through the sternum. To keep your neck safe, keep the back of the neck long at all times.
- Hold the pose for 5 to 10 breaths.
- To come out, lower the body down on an exhalation and give your body a minute rest, or you push yourself into Child’s Pose and rest there for a minute or so.
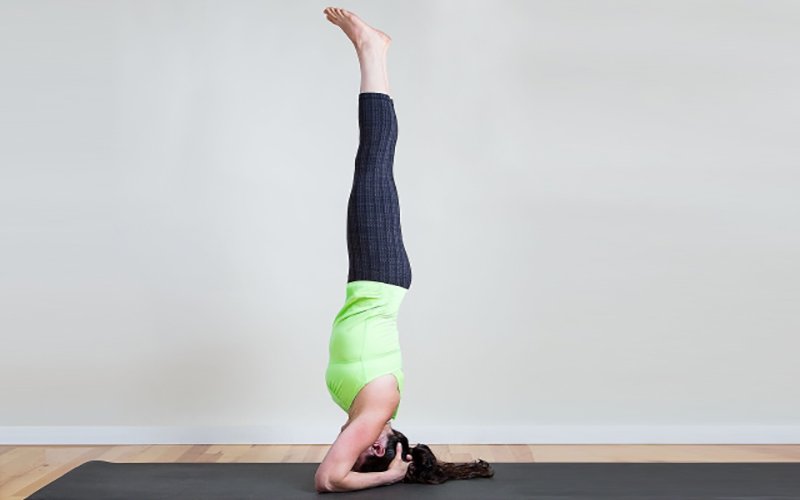
3. Supported Headstand Pose
Supported Headstand (or Salamba Sirsasana) is not for the faint of heart, and certainly not for a first-time yogi. That being said, it is a super-strengthener for the ligaments and muscles in your thorax and spine, and requires tremendous core strength. If you are a beginner, don’t worry – practice the other poses and work your way up to boob-yoga domination.
- Bring the short edge of your mat to a wall, you can fold over one end for some extra support or place a neatly folded, non-slip blanket on top of the mat.
- Come on to your hands and knees facing the wall.
- Place your elbows forearm distance apart on the blanket or folded mat. Bring the hands together, fingers interlaced, little finger side on the floor, tuck your bottom little finger in.
- The arms will form a triangular base – make sure this base is fully on the mat or blanket. The hands should be close to the wall, not quite touching it.
- Come into a Dolphin pose, tuck your toes, press down through your forearms, lift your hips up to the ceiling and then take the hips back.
- Keep lifting through the hips, relax your head and neck, let the head hang. Walk your feet in and allow the top of the head to touch the floor so the back of the head is resting against the palms of your hands. Keep space between the cupped palms.
- Keep your neck long at all times and for now put no weight in the head, just use the strength of your arms, your base, to make sure you’re strong enough to perform the Headstand safely.
- Keep shoulders away from your ears so that you are not crunching your neck.
- Upper arms are firming in to not let the elbows splay out, forearms are pressed into the floor. Keep tops of the wrist pointing up.
- Maintain the length in the front and the back of the body, front lower ribs in, keep lifting through the arms.
When you can consistently stay in Dolphin for 25 breaths each time you practice it without weight in the head, your upper body is strong enough to support you safely in Headstand.
- To continue, walk your feet in even further towards your body. Keep lifting through the hips. but allow some weight down through the crown of the head, lengthen through the neck. Your arms should be taking more of the weight than your head.
- You will feel the feet and legs almost naturally coming off the floor, bend one knee into the chest, then the other knee, still keeping most of the weight in your arms. On an in-breath you can bring your legs up in line with the rest of the body. Hips above shoulders and ankles above hips.
- Lift through the back of the pelvis, your abdomen firmed in, broaden the back of the legs, which releases the buttocks away from the sacrum.
- Keep length through the back and front of the body, keep the neck long, pressing the shoulders blades down and into the spine.
- Face soft and breathe calmly and evenly in your abdomen.
- With the right alignment Headstand should feel light, and your neck should feel uncompressed and long. If it doesn’t, keep the weight in your arms and keep strengthening your foundation.
- To come out, bend knees and bring your feet to the buttocks, knees to the chest, and with control bring your feet back to the floor.
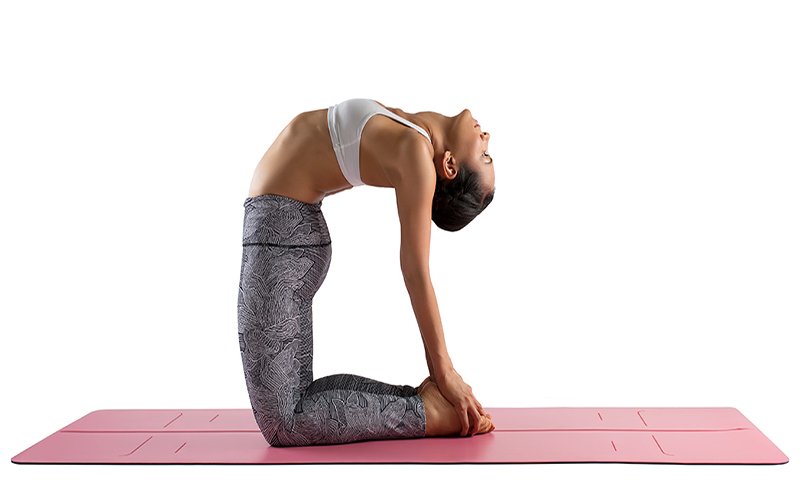

4. Camel Pose
Camel (or Ustrasana) is another fantastic back-pain reliever. It will stretch out your chest and strengthen your thoracic spine to give your girls a lift.
- Come on your knees, place the knees hip width apart, body upright. Toes tucked under, or if you are more flexible, point your toes back.
- Place your hands on your lower back, heels of the hands resting on the lower back, fingers pointing down.
- Engage your legs. Pull the thighs back so the hips are still over the knees. Rotate the inner thighs in a little and with your hands help to lengthen the buttocks down. At the same time visualise drawing the front hipbones together and up to activate the belly. Your hip bones and lower ribs firm towards each other. Try to maintain this action throughout the pose.
- With the lower body stable, begin to breathe in towards the chest, drawing the shoulder blades back as you lift the chest.
- On an exhale start to come into your backbend keeping the chest lifted and without crunching the neck or lower back.
- You can keep the head neutral throughout the pose, chin towards the sternum (recommended), if you take the head back, do so only when the opening in the chest is at its fullest and your neck is long and happy.
- Lift the lower back ribs away from the lumbar spine to create even more length in the lower back and to facilitate the opening in the chest even more.
- Stay in this pose anywhere from 30 seconds to a minute, breathing into the chest to facilitate the opening there. When you notice you cannot breathe properly you are taking the pose too far and you should back off to a variation you can sustain with breathing smoothly.
- To come out, place the hands to the front hip bones and guide them down as you lift back up on an inhalation. If your head is all the way back lead with the heart, bring the head up last.
- Neutralize and lengthen your spine in Downward Facing Dog Pose before resting in Child’s Pose for a few breaths.
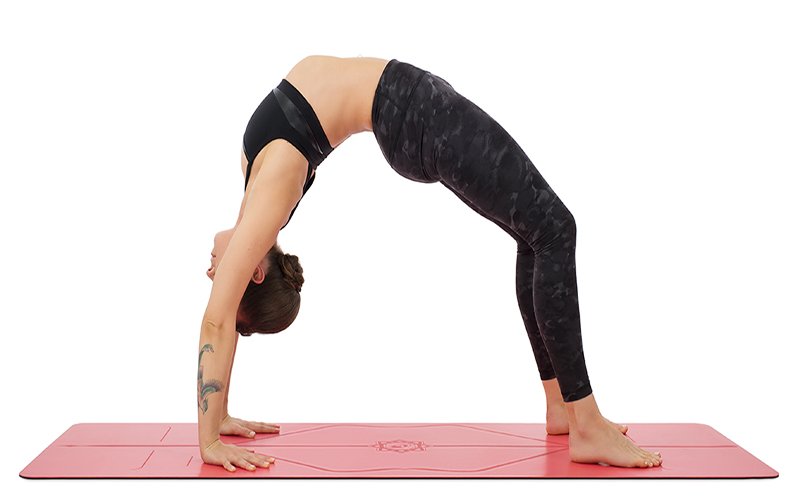
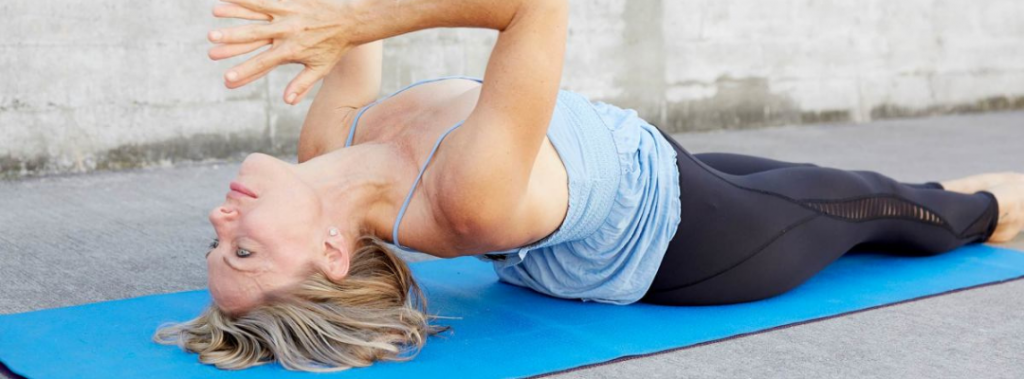
5. Wheel Pose
Wheel pose (or Chakrasana) lengthens your spine from your tailbone to your neck, allowing your to stand up tall and proud, helping your boobs to stand out. Bonus: A quick Chakrasana when you’re feeling sluggish can lift fatigue and help heal a headache.
- Lie on your back on the floor. Bend your knees and place the feet hip width apart, close to the hips. Bend your elbows and place your hands next to the head on the floor, palms open and wide, fingers pointing towards the shoulders.
- Press the shoulders down in the floor, feel how that opens and even lifts the chest somewhat. Press the inner feet down to keep the knees from falling out to the sides.
- On an inhalation lift the hips to the ceiling. Stay here for a breath or two.
- Inhale, and on your next exhalation pull the feet in towards yourself, ground the shoulders actively down into the floor to ground your shoulder blades on the back and take the armpits in and press into your hands to lift your body up, onto the crown of the head or straight away up to the ceiling straightening your arms as much as possible.
- Once up there, inner thighs roll in, tailbone lengthens, upper arms rotate outwards, upper back curls and you can let your head hang or lift your head back a bit to look down to the floor.
- To come out, exhale and lower yourself down to the floor as you look up to the ceiling, chin to chest.
- Hold the poses anywhere for 5-10 breaths and repeat 3 times.

6. Bow Pose
Bow pose (or Dhanurasana) is great for any of you well-endowed women out there whose breasts cause back pain. It stretches your whole spine and chest and gives your boobs beautiful shape.
- Lie on your stomach with your hands by your torso, palms up.
- Exhale and bend your knees, bringing your feet as close as you can to your buttocks and grab the ankles with your hands.
- Inhale press the pubic bone down, pull the belly in and push the ankles against the hands as you pull with the arms. Lifting the thighs and the chest.
- Press your shoulder blades into your back to open the heart.
- Stay here for a few breaths, breathing into your back body (this position can make it quite difficult to breathe fully).
- On an exhale release your arms, core engaged and come gently lying in a prone position. Lie quietly for a few breaths.
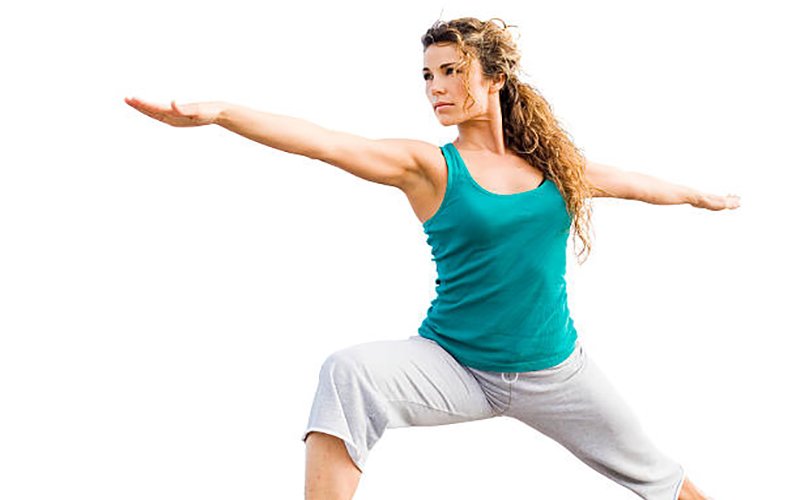
7. Warrior Pose
Warrior pose (or Virabhadrasana) is a powerful pose meant to help you feel strong and confident. It will help you extend your thorax, making it stronger and capable of maintaining posture and lifting your breasts.
- Take a big step back with your left leg.
- Right foot turned out to the top of your mat, left foot turned slightly in (same direction as the right foot) about 45/60 degrees .
- Stand with straight legs, press 4 corners of feet into the floor, firm your legs up.
- Inhale as you raise your arms parallel to the floor, keeping the shoulders down and neck long.
- Exhale as you bend the right knee, keeping your knee over ankle, not past! Bring your right thigh towards parallel to the floor. Sometimes it is necessary to adjust the legs, and bring them further apart. Heel to heel alignment.
- Check the alignment of your right knee, right over the ankle and it should be in line with the first 2 toes, roll top of thigh down towards floor on the right. Press down through the big toe to balance that action. Press top of left thigh back, and ground the outside of the left foot into the floor.
- Sides of hips firm in and elongate through the four sides of your spine evenly. Draw your abdomen gently in and up. Diaphragm soft.
- Extend through collarbones, through fingertips, and elongate evenly through the four sides of the neck.
- Look out over the right arm.
- your body should be in a right angle with the floor. Shoulders over hips.
- To come out, press into your feet and on an inhalation straighten the leg.
- Change the orientation of the feet to the other side, and repeat on the left side.


8. Gate Pose
Parighasana, a side opener, facilitates lymphatic drainage, expands the front of the chest, and twists the spine.
- Kneel on the mat, facing the long side of your mat. Stretch your left leg out and externally rotate the leg so that your heel is on the mat with your knee and toes (foot flexed) pointing up.
- Turn your right hip slightly forward compared to the left hip. Keep the torso facing the centre, even slightly to the right
- Open your arms out to the side parallel to the floor, palms facing up. Inhale, lengthen the body and exhale, lower the left side of the body to left leg, placing the hand down on the left leg.
- Ground through the right knee.
- On an in-breath lift your right arm up and over to the left. Encourage the right hip to keep rolling forward a bit while at the same time opening the torso to the right, gazing under the right arm to the ceiling.
- Stay in this pose between the 5-10 breaths. To come out, inhale extending out through the top arm and come back to centre.
- Bring the knees back next to each other and repeat on the other side.